Voiceover Gear We Love | The Ultimate Shopping List for Your Home Studio!
- Keep Dreaming Creative

- Jul 5, 2025
- 8 min read
Updated: Feb 3
With all of the different brands and types of gear on the market, it can be tough to figure out what you need - and what will work best for your home studio set up. In this blog post, we'll break down the best voiceover gear, from microphones, to headphones to recording software for your home studio (and budget)!
Disclaimer: As an Amazon Associate, I earn from qualifying purchases. This means I may receive a small commission when you purchase a product from my links, at no additional cost to you.
Microphones
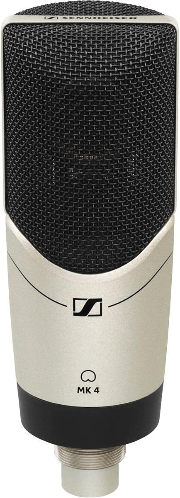
Condenser microphones are typically used in professional voiceover studios, because they capture a wide range of frequencies. Because of the sensitivity, they can pick up all of the subtleties and nuances of a great voice over performance.
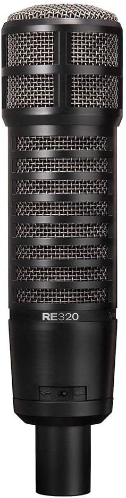
Dynamic microphones are known for being highly directional, which makes them a strong choice if you’re recording in a space that isn’t perfectly treated or soundproof. Unlike condenser microphones—known for their sensitivity and ability to capture subtle details—dynamics pick up primarily what’s right in front of them while rejecting much of the background. This narrower pickup pattern helps minimize unwanted noise, room echo, or outside sounds. For voice actors working in less-than-ideal spaces, a dynamic mic can deliver a clean, focused sound while keeping distractions at bay.
If you're just starting out, or if you're on a budget, the Rode NT1-A or the Apogee MiC Plus are great options. But if you have the money to invest in a higher-quality microphone, or if you want to make sure you're capturing every detail of your performance, the Neumann TLM 103 or the Sennheiser Professional MK 4 are fantastic choices. Then of course there is the 'gold standard' which is the classic Neumann U 87. Below are a few highly reviewed microphones for every budget!


Microphone Stand & Pop Filter
A high-quality, adjustable microphone stand is a crucial part of any serious voice actor’s setup. Whether you’re recording longform narration while seated or high-energy animation where you're standing and using your full body, your mic stand needs to move with you—not fight against you. Being able to easily raise or lower your microphone ensures that your posture stays aligned, your breath support remains consistent, and your performance stays physically connected. For seated sessions like audiobooks or eLearning, a stable, low-profile stand helps maintain comfort and mic proximity over hours of recording. For animation or video game work, standing allows for greater movement, emotional range, and vocal projection—so a boom-style stand that adjusts quickly and locks securely is essential. It’s not just about convenience—it’s about protecting your body, preserving your sound quality, and supporting your full range as a performer.
A pop filter is a simple but essential tool in voiceover work that helps eliminate harsh plosive sounds—like the burst of air you create when pronouncing “P,” “B,” or “T” sounds. These bursts can cause unwanted distortion or spikes in your audio, especially when you're speaking close to the microphone. A pop filter sits between your mouth and the mic, dispersing that air pressure before it hits the mic capsule, resulting in cleaner, more professional recordings. It also helps protect your microphone from moisture over time, making it a must-have for anyone recording voiceovers regularly.


Audio Interface
Another piece of equipment you'll need is an audio interface, which converts microphone and instrument signals into a format your computer and software recognize. Unless you're using a USB microphone, you'll need an interface that allows you to connect your microphone and headphones to your computer and record directly into digital audio Workstations (DAWs) such as Pro Tools, Logic Pro, Twisted Wave, or Audacity.
When choosing an audio interface, there are several factors to keep in mind. First, decide how many inputs and outputs you need. If you're only ever going to be recording one track at a time, 2 inputs / 2outputs should suffice. Ease of use is also a factor as some interfaces are much more complex to learn. Finally, consider the price tag, as they range from around $100 to over $1000 depending on their features and specifications. Even the most affordable interfaces sound great and provide the basic features, so don't feel you need to break the bank on this!


Headphones
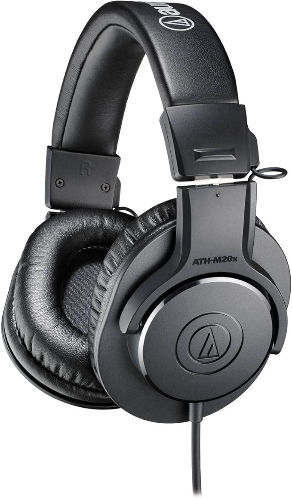
Wearing headphones while you record allows you to hear yourself clearly without any unwanted echoes or feedback. There are lots of different types and brands of headphones on the market, so it's important to find a pair that's comfortable for you to wear for long periods of time. You'll also want to make sure that the headphones don't leak sound, so that your recordings are as clean as possible. Below are our favorite tried-and-true headphones for your voiceover studio!

Sound Proofing
Soundproofing is essential for voice actors recording from home—especially if you're working in a space like a walk-in closet, home office, or spare room. To get broadcast-quality audio, you need to address two key issues: sound isolation (keeping outside noise out) and acoustic treatment (controlling how sound behaves inside your space). If you're in a noisy area with traffic, neighbors, or overhead planes, basic acoustic foam won’t be enough—you'll likely need noise-canceling curtains, heavy moving blankets, or mass-loaded vinyl to block external sounds. For treating the sound inside your booth, strategically placed acoustic panels can help deaden reflections and echo, especially on parallel walls. Even if your space sounds “okay” to the ear, your mic is far more sensitive—and most engineers expect a noise floor of -60 dB or lower for professional work. Investing in proper soundproofing not only improves your recordings—it saves you time in editing and protects your reputation with clients.


Questions About the best Voiceover Gear or Building a Home Studio? Read our Voiceover Home Studio FAQs!
Everything you need to know about building your voiceover setup—without the fluff.
What is the best microphone for a home studio?
Many voice actors ask “what is the best voiceover microphone for a home studio.” For professional-quality sound, most voice actors go with an XLR condenser mic paired with an audio interface. Options like the RØDE NT1-A or Audio-Technica AT4040 offer warmth, clarity, and a low noise floor. USB mics can work when you’re starting out, but for long-term quality and versatility, an XLR setup is the way to go.
How much does a home voiceover studio cost?
The average voice actor spends between $1,000 – $2,000 USD to build a decent home setup when they are getting started out. This includes your mic, interface, headphones, software, acoustic treatment, and accessories like a mic stand and pop filter. You can start smaller, but investing up front will save you headaches later. Of course, depending on the level of soundproofing you need in your space, the price can end up being much higher!
What headphones are best for voiceover recording?
Closed-back headphones are best because they prevent sound bleed into the mic. Look for a neutral sound profile and long-term comfort—especially if you’re doing longform work. Popular choices include the Beyerdynamic DT 770 Pro or Sony MDR-7506.
What kind of software do I need to record voiceovers?
You’ll need a Digital Audio Workstation (DAW) that allows for clean recording, basic editing, and high-quality file exports. Free options like Audacity are great for beginners, while pros often use software like Adobe Audition, Reaper, or TwistedWave for their speed and precision.
Should I use a USB or XLR microphone for voiceover?
USB mics are plug-and-play and great for beginners—but they’re limited in quality and flexibility. XLR mics paired with an audio interface offer far better sound quality, lower noise, and future-proof your setup as you grow in your career.
How do I soundproof a home studio for voiceover?
Soundproofing helps block external noise, while acoustic treatment controls sound inside the room. For home setups like closets or small rooms, noise-reducing curtains and acoustic panels are highly effective. If you live near traffic or noise, consider investing in thicker materials or building a vocal booth. Ideally, your noise floor should sit at or below -60 dB.
Can I really record voiceover in a closet?
Yes—and many pros do. Closets often have the benefit of small size and clothing for natural sound absorption. Just make sure to treat any reflective surfaces and monitor for background noise. A closet with acoustic foam or moving blankets can work beautifully with the right mic and setup.
What’s the best audio interface for voiceover work?
Look for something with clean preamps, low latency, and minimal setup. The Focusrite Scarlett series, SSL 2+, and Universal Audio Volt interfaces are great options. Choose an interface with phantom power and 1–2 XLR inputs to start.
What’s the ideal noise floor for a voiceover home studio?
You’ll want to keep your room’s noise floor at -60 dB or lower. This ensures your audio sounds clean and professional, with no hiss, hum, or ambient noise picked up during recording. If you’re consistently above that level, consider improving isolation or switching gear.
What’s the difference between soundproofing and acoustic treatment?
Soundproofing blocks outside noise from entering your space (planes, cars, neighbors). Acoustic treatment improves sound quality inside your space by reducing echo and reverb. Both are important for creating clean, usable audio.
What is a pop filter and do I really need one?
Yes—you definitely need one. A pop filter helps eliminate “plosive” sounds like P’s and B’s that can cause harsh, unwanted spikes in your audio. It also protects your mic from moisture during close-up reads. Even budget setups benefit from using one, and they make a noticeable difference in clarity.
What’s the best voiceover setup for traveling?
For travel, look for gear that’s compact and quiet. A USB mic like the Apogee HypeMic or Rode NT-USB Mini, closed-back headphones, and a lightweight stand can all fit in a backpack. Use a portable vocal booth or stack pillows/blankets in a hotel closet to reduce reflections and outside noise.
Do I need a vocal booth to record voiceover?
Not necessarily. A vocal booth helps isolate sound and control reflections, but many actors record broadcast-quality audio in walk-in closets or small rooms with proper treatment. If your space is quiet and treated well, a dedicated booth isn’t required—though it’s a great upgrade for noisy environments.
What’s the best boom arm or mic stand for voice actors?
Choose a stand that adjusts easily and stays solid without sagging over time. For seated sessions, a tabletop boom arm saves space and offers quick mic repositioning. For standing work, especially animation, a heavy-duty floor boom stand gives you full movement while keeping your mic stable.
What’s the best way to improve audio without upgrading gear?
Focus on your environment. Treat the space with acoustic panels, eliminate background noise, and keep your mic placement consistent. Even a great mic can sound bad in a reflective or noisy room, so improving your soundproofing and mic technique will often make a bigger difference than buying new gear.
If you need help setting up your studio, or are looking for one-on-one voiceover coaching, check out our services below!


